


Share this to


Let’s start with some context to this guide: In the first nine months of 2020, HubSpot's subscription services jumped by 30%. If it wasn’t clear to everyone already, HubSpot is the CRM of choice for “scale up” companies–but this does come with some new challenges. Moving into the enterprise CRM platform space means dealing with a lot of big organisations who already have high-level CRMs that they’re bought into.
The most common integration you will come across is with Salesforce, one of the most powerful and customizable CRMs on the market. Although HubSpot is both a quick to deploy and easy to scale CRM, when integrating it with other systems you need to be careful in how you approach the task or you can end up creating a labyrinth within a maze of complex property associations, syncs, and data duplicates.
When integrating these platforms you will most likely be working with your HubSpot expert and the Salesforce expert (consultant or internal). While these people will be experts in their preferred CRM, they present the risk of not knowing nearly as much about the other system.
Initial learnings: Enterprise HubSpot to Salesforce integrations
After running several Enterprise level HubSpot to Salesforce integrations (with a bit of Drift thrown in as well) we sat down with our integration partner agencies and asked them, ”If we were to do this all again what would make it easier for all parties?” The common response was to provide a primer or how-to document outlining some of the key aspects that clients ask for, but are not common knowledge. So that’s what we created!
In this mini-guide, you will find pragmatic solutions and explainers for some of the trickier aspects of a CRM integration. We hope it helps and saves your laptop from being thrown across the room in CRM-induced frustration.

Situation 1: The Selective Sync
Use case
You want to use HubSpot for only a small cohort of your Salesforce database.
Solution
To do this, you need to set up a Selective sync which is a process limiting which Salesforce records sync automatically from Salesforce to HubSpot.
TL;DR
You need to set up a user with access to only the records you want in HubSpot and then make them the admin of the Salesforce sync.
Understanding the integration user
The Salesforce User (whose credentials are used to sign in to Salesforce from the HubSpot Settings screen) facilitates the connection between HubSpot and Salesforce–we'll refer to this user as the integration user.
The basic principle to achieve a selective sync from Salesforce to HubSpot is to intentionally hide or expose records in your Salesforce org to the integration user to either prevent or allow those records to sync with HubSpot. If the integration user has read/write permission to a Salesforce record, the record is eligible to sync with HubSpot.
Stated differently, any Salesforce record that the integration user cannot read/write will not be eligible to sync with HubSpot.
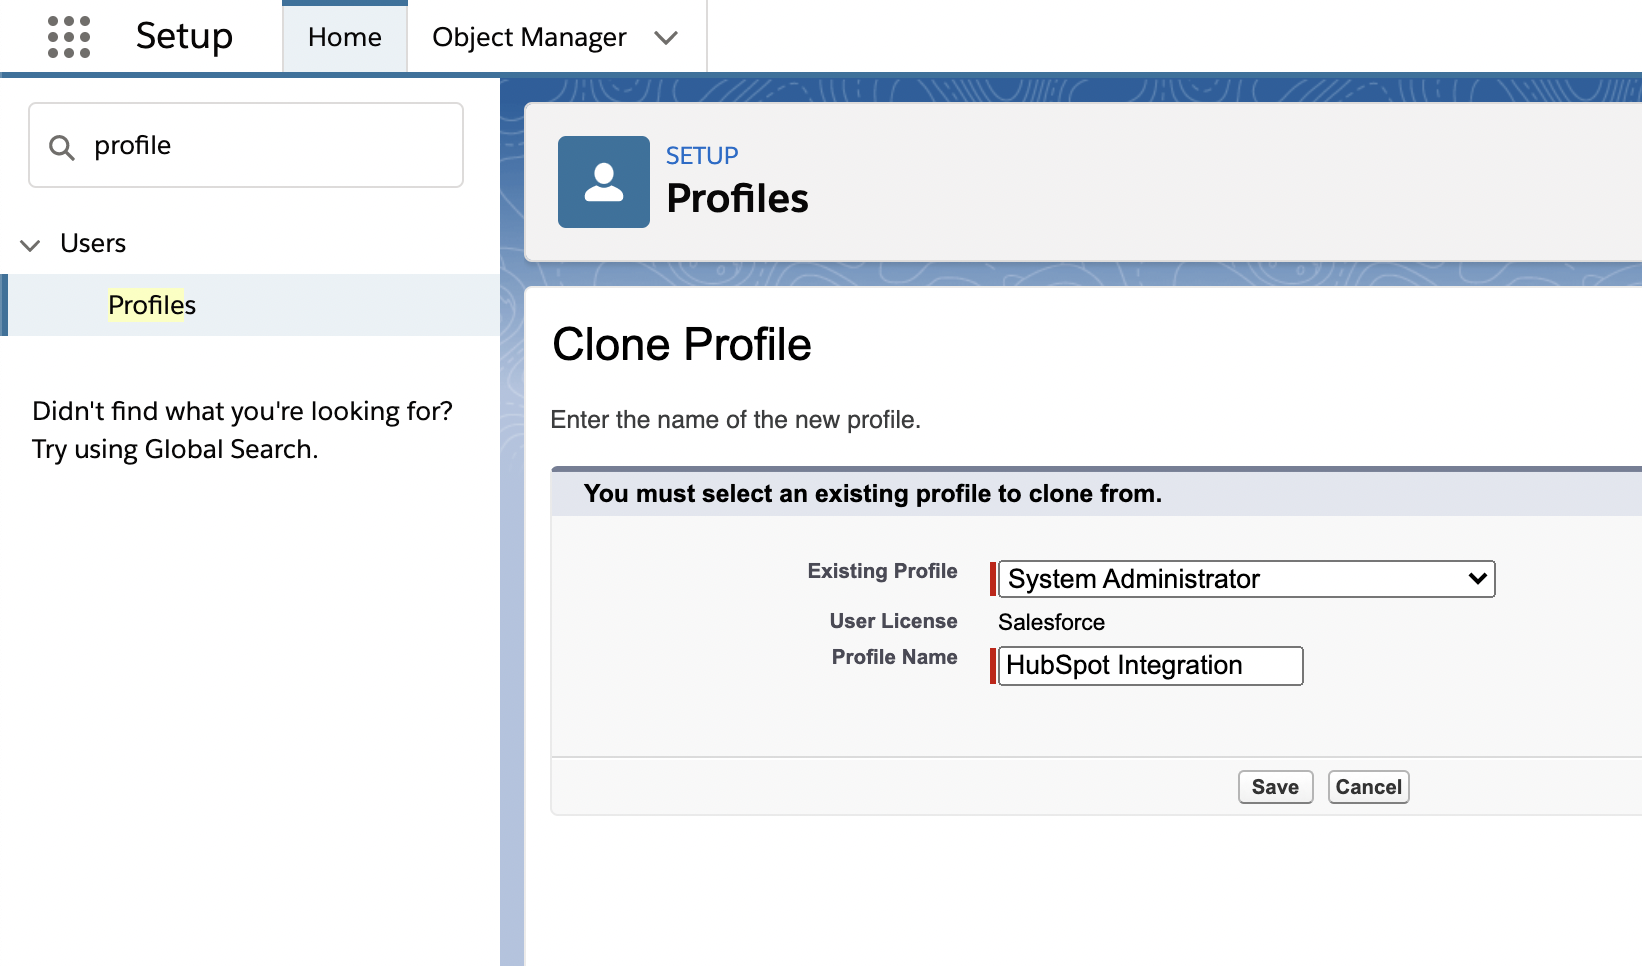
Step 1: Create a new Salesforce Profile
To ensure that you have all of the necessary permissions, we recommend that you clone the System Administrator profile and modify the cloned profile. After cloning the profile, edit the profile's Standard Object Permissions to remove the Data Administration permissions from any object that you would like to sync selectively with HubSpot. In this example, we are going to limit Leads and Contacts. Remember to save your changes when you are finished.
Edit the HubSpot integration’s user profile to remove “View/Modify All” permissions from contacts and leads under the standard object permissions”
Step 2: Create a new Role
Next, create a new Role to be used by the integration user. In this example, we create the new Role at the highest level of the Role Hierarchy. So, the new Role will be outside of any existing hierarchical Permissions schemes. Creating the Role at the outside of any existing hierarchies is typically the simplest implementation, but the specific needs of your Salesforce organization may vary.
*Add the new role outside of the current hierarchy to ensure you don’t cut off access for lower level roles.*
When creating the Role, don't worry about the Contact Access settings; this setting will be overridden by the Sharing Rules we create later in this guide.
If you don't want to create the new role outside of the existing hierarchy, please keep in mind two possible issues:
- If the integration user’s Role is below other roles in the Role Hierarchy, you may unintentionally expose records to users who have a Role higher than the integration user.
- If the integration user’s Role is above other roles in the Role Hierarchy, the integration user may have access to records that do not meet the Sharing Rule. This may cause records to unexpectedly sync with HubSpot.
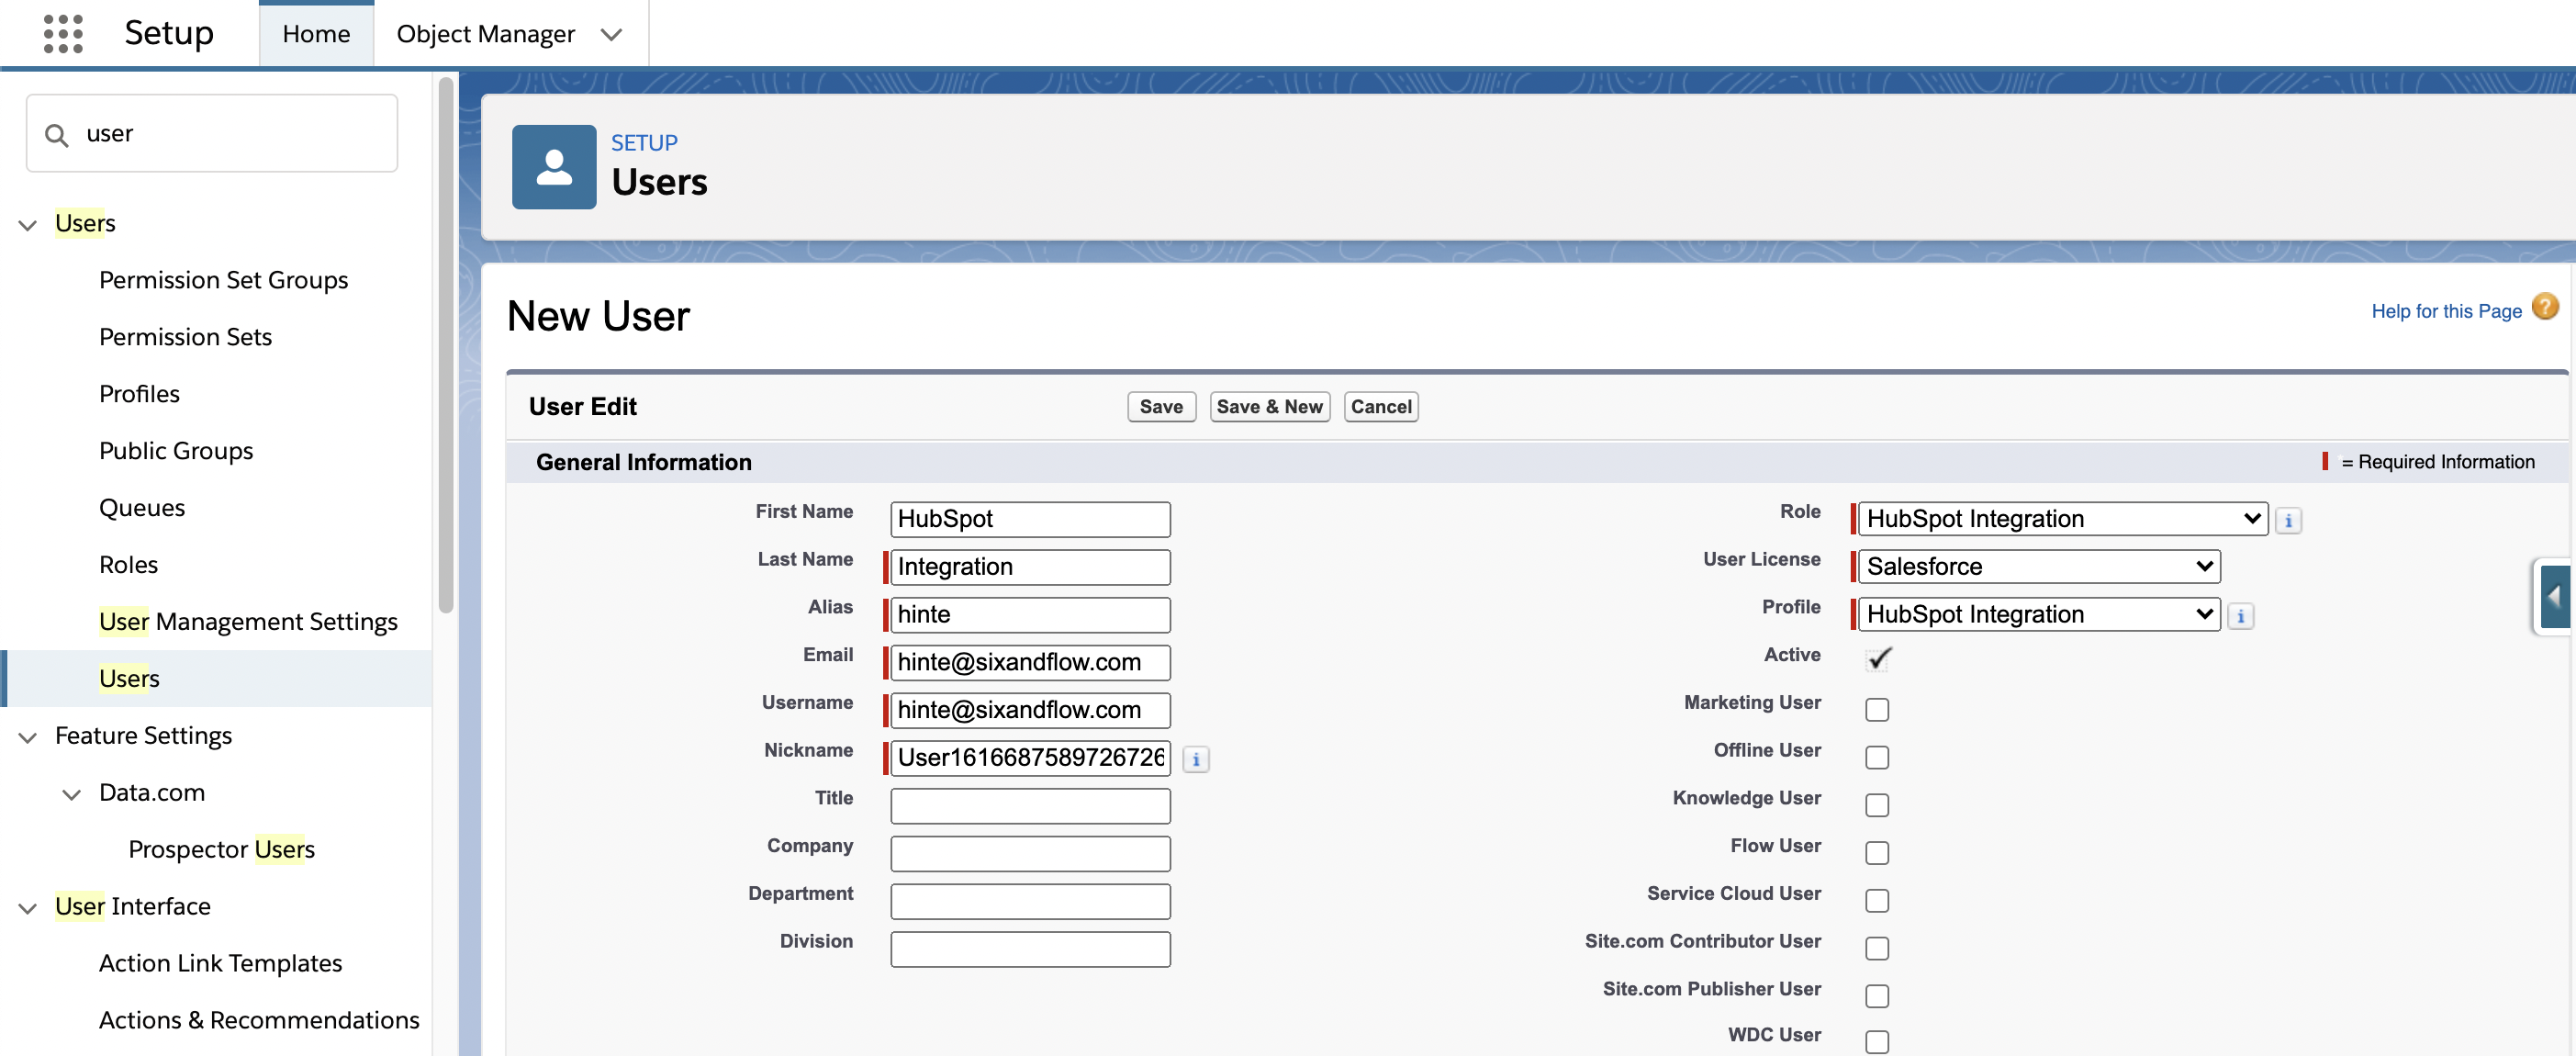
Step 3: Create a new Salesforce user with the new Profile and Role
Now that we've created the Profile and Role for the integration user, we can create the new User with the Profile and Role.
Step 4: Assign the HubSpot Integration Permissions to the Integration User
Last, make sure the integration user is assigned the HubSpot Integration Permission Set. Navigate to the HubSpot Integration Permissions in your Salesforce Org's Permission Sets
Note: this Permission Set is only available after installing the HubSpot Managed Package in your Salesforce Org.
Situation 2: Configure your Salesforce Sharing Settings
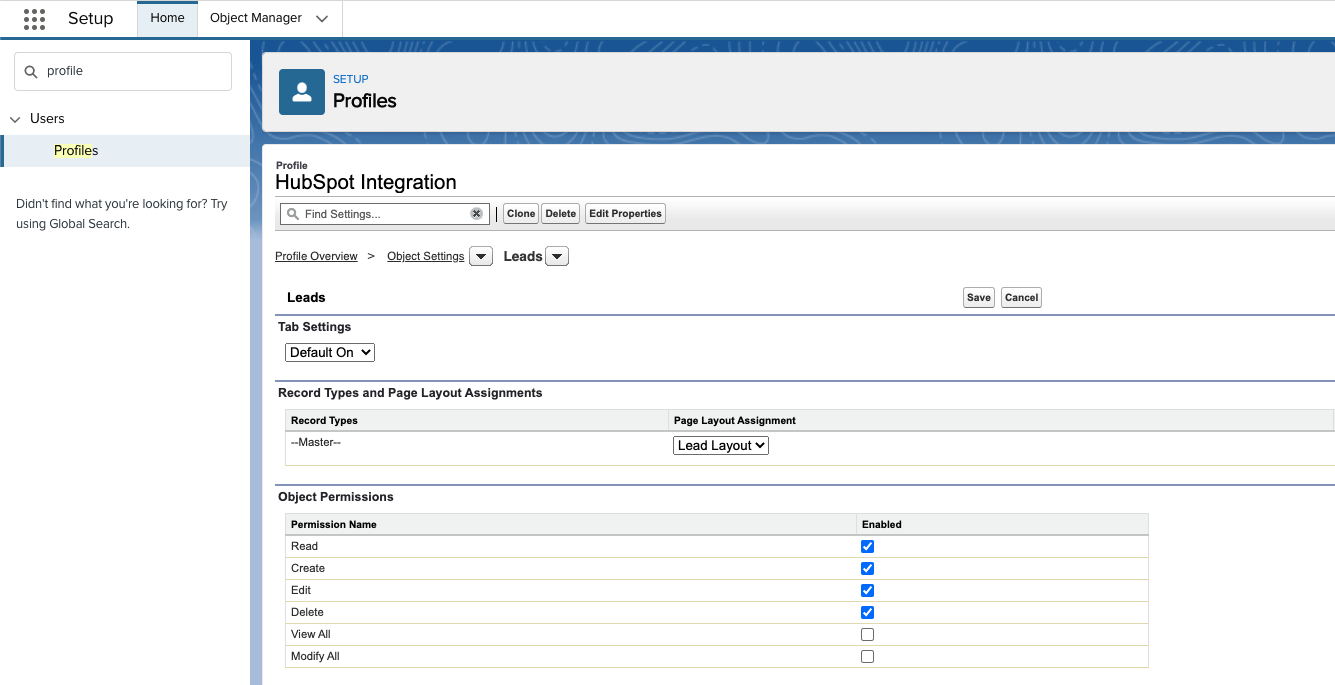
Now that we've created the integration user with its own role and profile, we can configure your Salesforce Organization's Sharing Settings to hide or expose the desired records to HubSpot. The following steps demonstrate the process on the Lead object, but this process can be repeated on the Contact object or any other object for the same effect.
Step 1: Set the Organization-Wide Default Sharing Settings to Private
First we need to set the Organization-Wide Default Sharing Setting for the object to private. In this example, we are editing the settings of the Lead object. If your Organization-Wide Default setting was 'Public', you may need to edit individual Profiles to give View or Modify All access to this Object. Any profile with View/Modify All permissions to an object will override the Organization-Wide Default.
Step 2: Define Sharing Rules based on criteria
Create a new Sharing Rule to choose which records sync with HubSpot. In this example, we are syncing leads if they have both a 'True' value in a custom field named, Sync to HubSpot, and an '@' symbol in the email field to verify that the lead has an email address.
Records without a valid email address will not sync to HubSpot, so this adds additional safeguards against sync errors. This is only an example–any criteria can be used in a Sharing Rule, so Rule criteria can vary to meet your business needs. Make sure the Sharing Rule is set to 'Read/Write' Access so that the HubSpot integration can continue to update records.

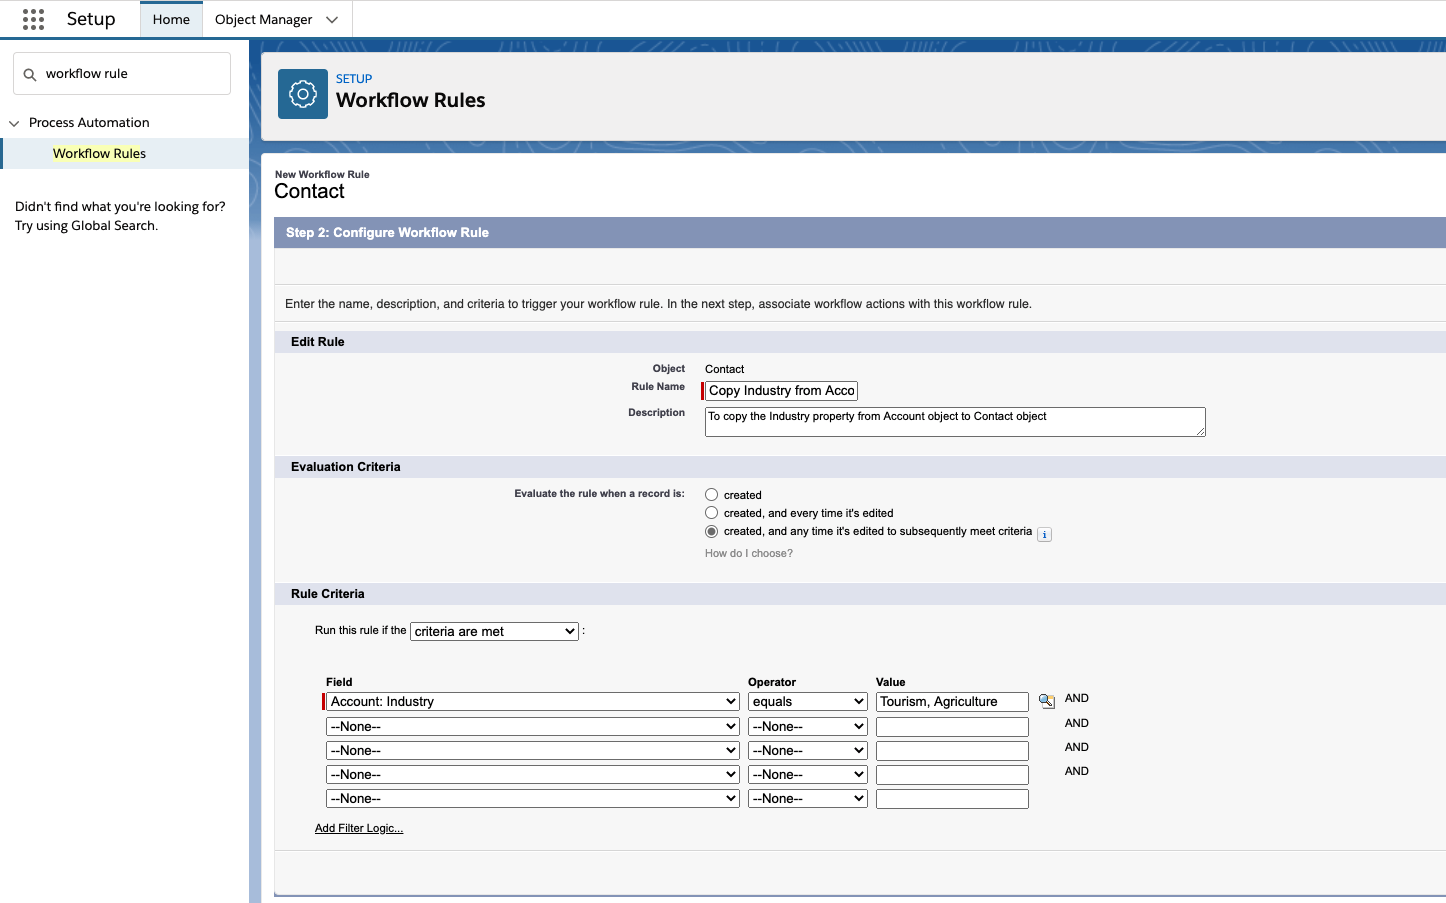
Ensure that the accounts and contacts that you are pulling across have a shared field in Salesforce. This is a bit tricky to do, but a necessary step as a cross-object formula can’t be used within the Salesforce Sharing Rules. So, to ensure this works properly, we’ll need to make use of Workflows within Salesforce alongside custom fields.
To do this with Selective Sync, you’ll first need to figure out which field in Salesforce designates the right Account; depending on your unique setup, this could be anything from Geography, to Account Type, or a number of different fields.
As an example, let’s say we only want to pull across Accounts where the Industries are Tourism & Agriculture. We’ll use Industry = Tourism or Industry = Agriculture as our criteria for sharing, but the Industry field only lives on the Account object. In order to properly pull across the value, we’ll also need to create an Industry text field on the Contact object to house the shared data. With that field created, the next step is to create a Workflow Rule within Salesforce to copy the field value from the Account Industry field, to the Contact Industry field we just created. Here, you’ll want to create a Workflow Action using a Cross Object Formula; in our example, the formula may look something like “Account.Industry.DeveloperName.”
Finally, once that Workflow Action is in place, you’ll create a Workflow Rule that triggers the Action we’ve just created - in this case, you’ll set up a new Workflow Rule for the Contact Object that will trigger any time the Account Industry = Tourism or Agriculture. Once the criteria here is met, the Workflow Action will copy the value over from Account to Contact so that they’re in sync, and with that set we can ensure the criteria within our Sharing Rules are working uniformly across any related objects.
Situation 3: The Point of Origin field
Use case
You have a sales team that is working out of Salesforce and they are contacting a lead and redirecting to a webpage hosted on HubSpot or using HubSpot forms. When the lead passes back through to Salesforce via the sync the lead/contact source field is being changed by the sync which is messing up your reporting.
TL;DR
Set up a property in Salesforce called “Point of Origin” then make this property immutable once changed. This way even if the source changes the Point of Origin will remain the same and you will be able to report on this and then look at the source as an influencing property.
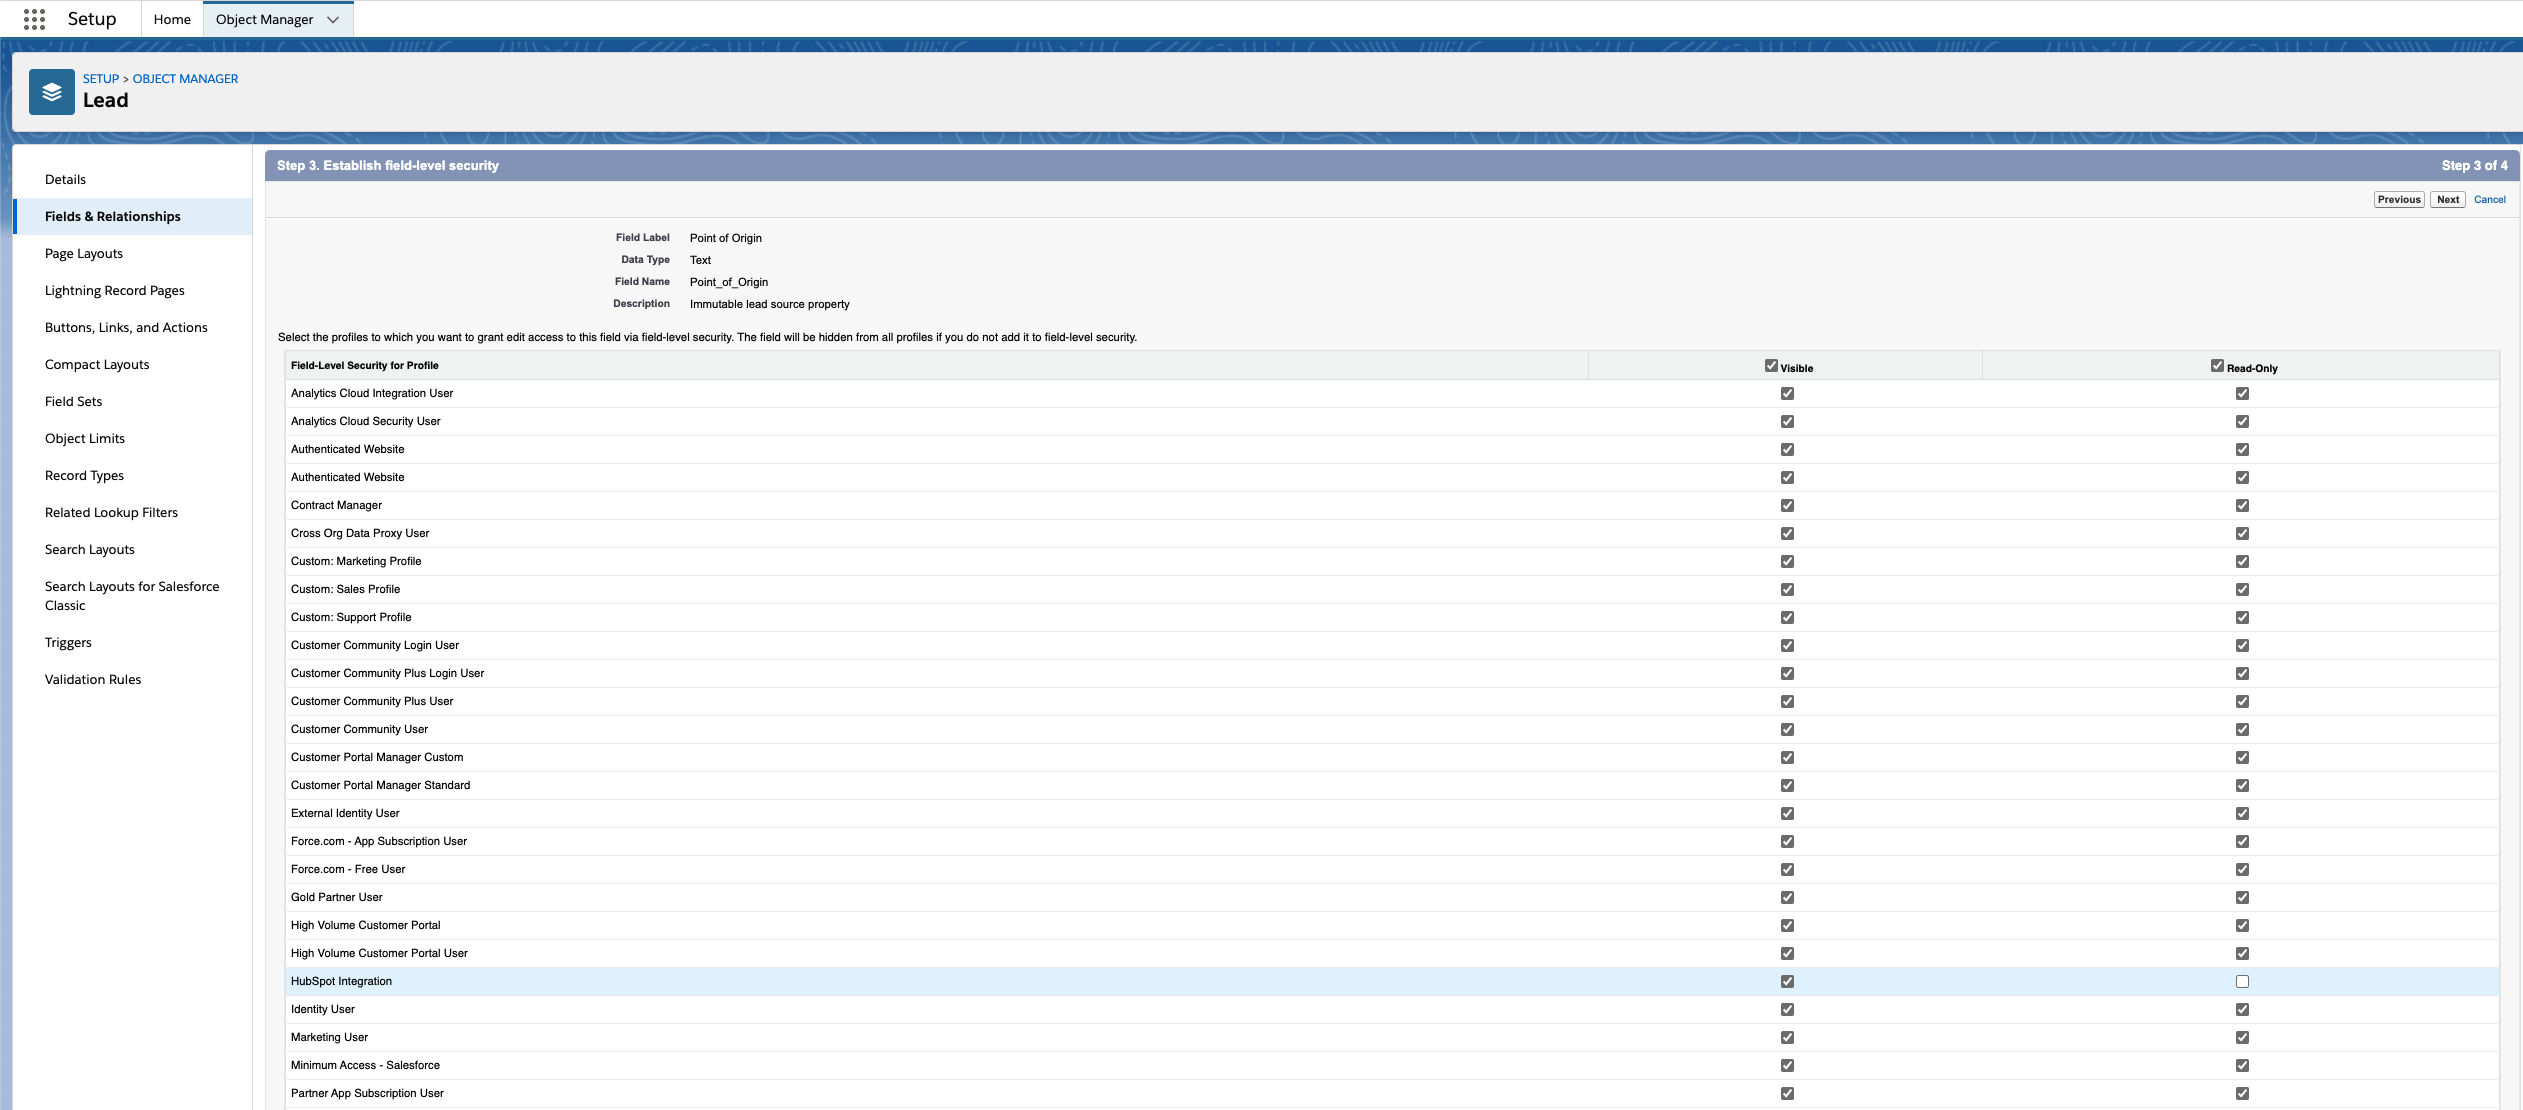
Solution
We see this a lot where people are having multiple touch points with a lead and they never really know which touch point is the source. This means that when it comes to crediting channels you are not getting the full picture and don’t know where to focus your efforts.
The solution to this is to set up a property in Salesforce called “Point of Origin” then make this property non-modifiable(unless by admin) once changed. This way even if the source changes the Point of Origin will remain the same and you will be able to report on this and then look at the source as an influencing property.
Once you have set this property up you can add it to the HubSpot sync and set the sync rules to “Prefer Salesforce unless blank.” By doing this, HubSpot will never overwrite what exists in Salesforce unless no action has been taken by prior (e.g. a fresh lead).
This way for example if a lead is researched and dealt with by a Salesforce user the Origin Field will be set as “Sales” then said lead could go and research on a website and convert through a HubSpot form. The sync will change the source to “Organic search” for example but since you have changed the sync rules to prefer unless blank, the origin field will remain as “sales unless manually changed by an admin.”
Situation 4: The multi-currency Fix
Use case
You work across many different regions and you have multi-currency setup in Salesforce but when you sync this to HubSpot your figures are wrong on the deal object.
TL;DR
Set up a workflow in Salesforce to normalise the amount into your chosen currency and then sync that with the amount property in HubSpot.
Solution
HubSpot has multi-currency as does Salesforce but the 2 don’t play nice when moving across the sync. The common field for both systems is the amount field and this will be automatically synced across.
In Salesforce the selected base locale determines the currency that appears. For example, if the base locale is French - France, then the currency is EUR. The base currency, defined in the Administration module, reflects the system currency. If a base locale isn't configured, then English becomes the base locale with the U.S. Dollars as the currency.
*Country codes are per the ISO 4217 standard, for example, USD for U.S. Dollars and EUR for European Euros.*
To solve this issue all you have to do is make sure that Amount in the base currency is the field that is synced and not the alternative currency. Once you have this field aligned in sync ensure that the system that you want to have primacy (normally the system you use for your financial reporting) is set to be the preferred field. (i.e. Always prefer Salesforce).
Situation 5: The Inclusion List Scenario
Use case
You want to use HubSpot for only a small cohort of your Salesforce database and you need to ensure that not all data from HubSpot is pushed across to Salesforce.
TL;DR
To do this you need to set up an Inclusion list that will use the list logic in HubSpot to filter the leads that come through.
Solution
In the HubSpot-Salesforce integration, you can create and use an inclusion list to limit the contacts that sync from HubSpot to Salesforce. Contacts that are not in your inclusion list will not sync between HubSpot and Salesforce.
First decide on the criteria that you want to use to send leads across to Salesforce. We would suggest creating a custom property that is called “sync to Salesforce” or something similar that is easy to identify. Next create an active list that uses the property as its determining factor.
Navigate to Sync Settings > Settings HubSpot next Salesforce.
In the "Limiting what syncs" section, click the dropdown menu and select an existing active list. To create a new active list, click + Create Inclusion List.
If you select an existing active list, the setting will update automatically.
If you click + Create Inclusion List, you'll be redirected to create a new list in the lists tool.
In the top left, click the pencil icon edit and enter a name for the list, then select your list criteria. Learn more about determining your list criteria.
In the upper right, click Save. Your list may take some time to process.
Return to your Salesforce integration settings. In the Inclusion List setting, click the dropdown menu and select the newly-created active list. The setting will update automatically.
Situation 6: Understanding campaigns by CRM platform
Use case
You want to track campaigns from HubSpot across into Salesforce and vice versa to be able to see better ROI.
TL;DR
Campaigns in HubSpot and Salesforce are entirely different things. You need to create a report to show you stats and not rely on the out-of-the-box tools.
Solution
Campaigns in Salesforce and HubSpot are very similar to Rugby league and Rugby Union...similar sounding names, but totally different sports. A campaign in Salesforce is a list of contacts, in HubSpot it is a grouping of assets.
You can tag leads that come into HubSpot with a Salesforce campaign from the form by updating the settings or you can use HubSpot workflows that will allow you to set Salesforce campaign membership with a campaign member status. This is the only place in-app you'll be able to set both of these values.
A point to remember is that campaigns are only visible in HubSpot if they're marked as Active in Salesforce. So ensure the campaign in question has that checkbox selected, then refresh in HubSpot.
For reporting purposes it is essential that you set up your campaign reporting in both systems but if you think that you will be able to get one unified reporting view then unfortunately you will really struggle to do this.
The best approach is to use HubSpot’s reporting for the “how” aspects of your campaign. Ask yourself:
1. How was landing page conversion performing?
2. How was Social lead generation performing?
3. How many leads progressed on this workflow?
Finally, use a Salesforce campaign for organising your sales team and the financial results.
If a record is already syncing between HubSpot and Salesforce, then any new campaign enrolment on the Salesforce side syncs back to HubSpot.
Situation 7: Spotting custom properties in the sync
Use case
You want to be able to quickly find a custom property in Salesforce but are unsure of how.
TL;DR
All Salesforce custom properties end in “_c” so, simply look for this.
Solution
All Salesforce custom properties end in “_c” so when you are property mapping from HubSpot to Salesforce and are unsure of what elements are custom or not simply look for the “_c”
Contact partitioning in HubSpot
Use case
You want to be able to partition of contacts by team on the HubSpot system using a strict team based hierarchy and external users.
TL;DR
Create a user with limited permissions and then place them within the team.
Solution
To give an external team access to some of the contacts within HubSpot, but not all, you need to create a team. If you are a member of a team, you have access to all other members of that teams contacts.
To partition a third party, we need to set up a “dummy user” who only has access to a segment of the information that is granted using a “secondary owner” property. If you set up a field called " Secondary Owner” or something to that effect and make this a HubSpot user property.
Next, begin to tag the contacts companies and deal with the “secondary owner” property. Make this dummy user a part of the dummy team and then add all subsequent external contacts into this team. This will give them access to the object but prevent them from accessing the objects of an internal user.
In conclusion…
...it’s permissions, friend!
Salesforce is built like a tank–large, durable, and super powerful with lots of moving parts. Like a tank, you don’t want just anyone hopping in and causing havoc on the surroundings. This is why Salesforce has gone all in on segmentation and permissioning to ensure that your data but also the system is protected.
HubSpot has this capability too but to a lesser extent (currently). However, the main difference is that HubSpot is a more intuitive system with a better UI...meaning that if something isn’t working, you will normally get a prompt explaining why the system isn’t moving and what you need to do to fix the issue.
With Salesforce, (for those who don’t know the system to an expert level) it can take you hours of brainpower trying to figure out how you can achieve data symmetry across both HubSpot and Salesforce without having to get expensive consultants in for both systems. From our experience permissioning is one of the main reasons that your sync isn’t working as intended. This could be the permissions level of the investigator or the Sync admin but either way we suggest that that is the first place you look when something just isn’t working.
TL;DR - It’s almost always a permissions issue.


Unleash the power of RevOps
Maximize revenue and sales today.
Begin experiencing faster growth by managing revenue generation cross-functionally. Download the complete guide to RevOps to learn how you can align your teams and scale revenue.
